
I am not really an artsy person, but I have always enjoyed doing crafts. Now that I have to juggle a full-time job, taking care of the house, and spending time with my family, I don’t really have much time for anything else. I have pinned a whole board of fun craft ideas, but I have never completed any of them – either they are too difficult, require too many materials, or would take too much time that I don’t have to spare, especially since I want to use whatever free time I do have with my girls. It would be nice if I could do both at the same time!

Jennifer Garner has launched a line of fun
“We Made It” kid-friendly craft kits sold exclusively at
Joann Fabric and Craft Stores. The kits are designed for children ages 4-11 and there are over 100 different types of fun craft kits and projects available, including:
- Make It Grow kits for gardening and nature;
- Make It Playful kits for costumes and dress-up;
- Make It Sweet kits for baking and cooking activities; and
- Make It Memorable kits for painting, sewing, and decorating.
We received three We Made It kits – the Selfie Pillow Kit, the Doll Pin Garden Markers Kit, and the Fruit Bird Feeder Kit. I wanted to introduce my oldest daughter to crafting (and spend some time with her doing something fun), and I thought these three kits would be perfect for her to try out!

The
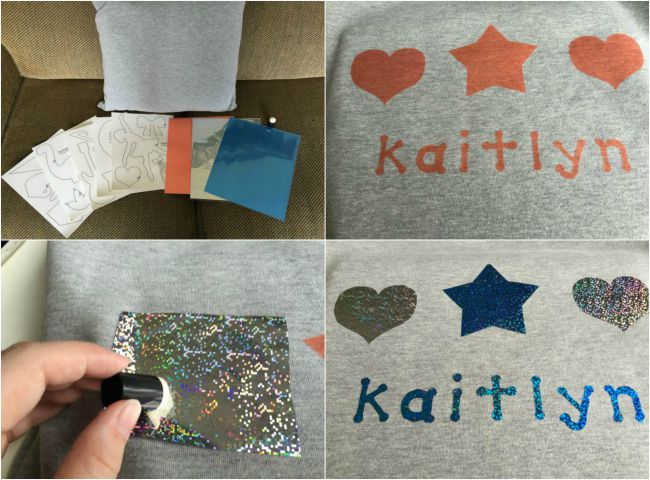
Selfie Pillow Kit comes with a square pillow and a soft cover (it felt like a comfortable sweatshirt), design stencils (that include a heart, star, guitar, music notes, ballerina, sports items and more!), adhesive paper, and foil paper. First, we had to choose the design we wanted for the pillow, either from the design stencils or our own stencils. We decided on two hearts, a star, and my daughter’s name. I traced the designs on the back of the double-sided adhesive sheet and cut them out. We then peeled one of the sides off and stuck the designs where we wanted them on the cover (be sure to take the pillow out and put a hard book or something in the cover while doing this!). Once our designs were in place we peeled the other side off and applied the foil paper, using a foil dauber to make sure the foil was applied completely. Then we just peeled the excess foil paper off and were left with our bright and shiny designs! The only thing left to do was put the pillow back in the cover and enjoy! This was my favorite craft kit by far, and even though I had to do most of the work on this one (with the tracing and the cutting), my daughter sure loves her new pillow.
The
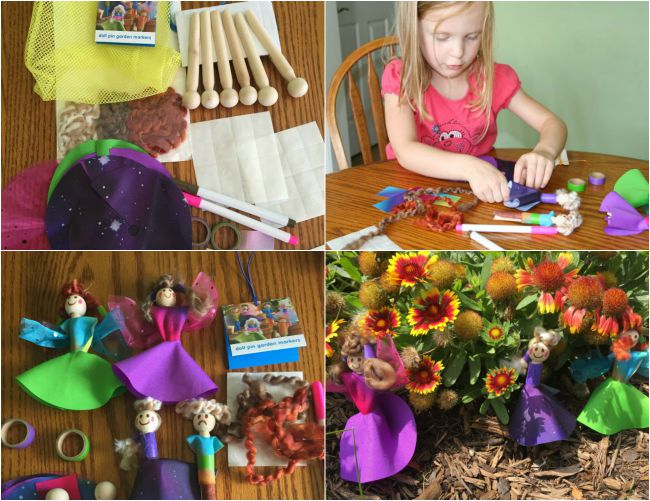
Doll Pin Garden Markers Kit was more fun and age-appropriate for my daughter. This kit comes with six wooden pins, yarn, fabric pieces, markers, colored tape, string, and adhesive dots. With this kit, your child’s imagination can run wild in decorating the doll pins. My daughter wanted to make four dolls – one for her, one for her little sister, one for me, and one for her dad. We started by using the markers to draw on the dolls’ faces, then used the yarn for their hair. We then added clothing to our dolls with the fabric pieces, tape, markers, and adhesive dots for shirts, skirts, pants, and even wings. The final step was to display our doll pins in the garden. We couldn’t decide whether to place them in our flowerpots or put them directly in the garden. They look great either place and are a fun addition to our garden.
Finally, the
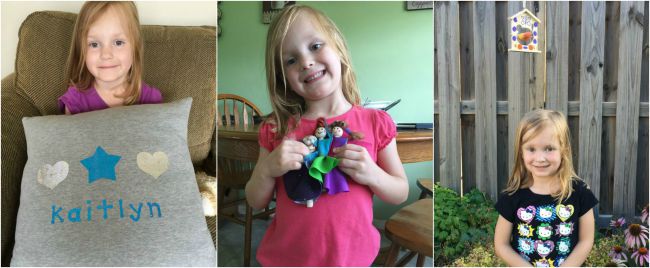
Fruit Bird Feeder Kit comes with a wooden bird feeder stand, acrylic paint, foam brushes, and stencils. The stencils were sticky so I could place them where we wanted and they did not move around during the painting. I stenciled a butterfly, bug, and my daughter’s initials, then I told my oldest daughter to do whatever she wanted to the rest of the bird feeder – the more colorful, the better! She had a great time decorating with the paint, and her little sister even joined in with the painting. I think our bird feeder looks great! After it was finished drying, all we had to do was put in a piece of fruit (we used an apple), hang it in the yard, and wait for the birds to come feed.

I really enjoyed doing the projects for each of these kits. There was nothing too difficult or time-consuming in any of the kits that we received, and I liked that we could really personalize our items. But the best thing of all was spending time with my daughter and seeing the smile on her face when we finished each project!
Again, all of the
We Made It craft kits are available exclusively at Jo-Ann Fabric and Craft Stores (either online or in stores), with prices ranging from $2.99 to $49.99 (and you may be able to catch them on sale now). Check out all of the fun
We Made It kits available, watch instructional videos, and
find a store near you! They offer an enjoyable way to spend time with your children, and they would make great gifts too!

Connect with
Jo-Ann Fabric and Craft Stores on
Facebook,
Twitter,
Instagram,
Pinterest, and
YouTube.


10 Responses
how cute,my grandkids love making crafts with me,they love to make gifts for their parents to give
CIAO BELLA corduroy swing top and legging
I have so many craft “to-do’s” it’s ridiculous! I think my daughter would have fun with the Fruit Bird Feeder Kit.
I love these craft projets, we encourage a lot of crafting at our house. So much better than computer/video gaming.
looks like a fun project to do with my daughter
We love to do craft projects and I love the kits
I love crafting with my kids These kits are so perfect in that they come with all the supplies
Wow lots of great ideas for indoor crafts especially with winter just around the corner 🙂
Hi, I am in the middle of making the pillow and can’t figure out how to get the orange top to the sticky off the pillow. When I try the sticky comes up too, any ideas??
Hello!
I asked Angela and she said, “I had trouble too. I think I just had to keep trying to find out where they separate and carefully pull it off. Maybe using a knife or something to try to get between the layers?”