

If you have ever priced throw pillows (and I’m sure you have if you’ve ever decorated a living room, family room, or a bedroom), then you probably know how expensive it is to buy throw pillows from the store. I just can’t fathom spending loads of money on a single pillow (and a small pillow at that!). I was pleased to discover that it isn’t hard to do it yourself. And I am even going to share with you how to make no-sew throw pillows for about $6 or $7 apiece.
It all started when I was telling my good friend about my need for throw pillows, but that I was hesitant in spending that much money on them. Before I could finish telling her, she blurted out, “make your own!”. Wait, what? Apparently she has never seen me sew! She assured me that it is really easy. Well it did sound pretty easy, and I just had to give it a try…with one change. I had another plan which didn’t require sewing.
But first, let me answer this all important question:
What can I use to stuff a pillow?
When I tell people about making their own no-sew throw pillows, they are always baffled by what would go inside the pillows, if not just a pillow itself! There are a few choices to use for pillow stuffing. I personally use fiberfill, as it is easy to work with, is inexpensive and one bag is almost equal to one rectangular, placemat sized throw pillow.
What do you need to make your own pillows?
~Placemats: The kind with two pieces of fabric sewn together front and back, so when opened there is a pocket in the middle and space for stuffing
~Fiberfill: Plan on one bag per placemat sized pillow
~Seam ripper (or small scissors)
~Fabric Glue
~clothespins or small paper clips

Where can I buy cheap fabric placemats?
I looked at Pier 1 Imports and Cost Plus and found some placemats that were two sided and perfect for my DIY decorative pillow project. The placemats at Cost Plus World Market were only $2.99 each, and the ones at Pier 1 were only slightly more. For the fiberfill stuffing for DIY pillows, I went to Michael’s and purchased two bags of fiberfill for $2.99 each. It takes a a bag or less for each throw pillow. What a steal!
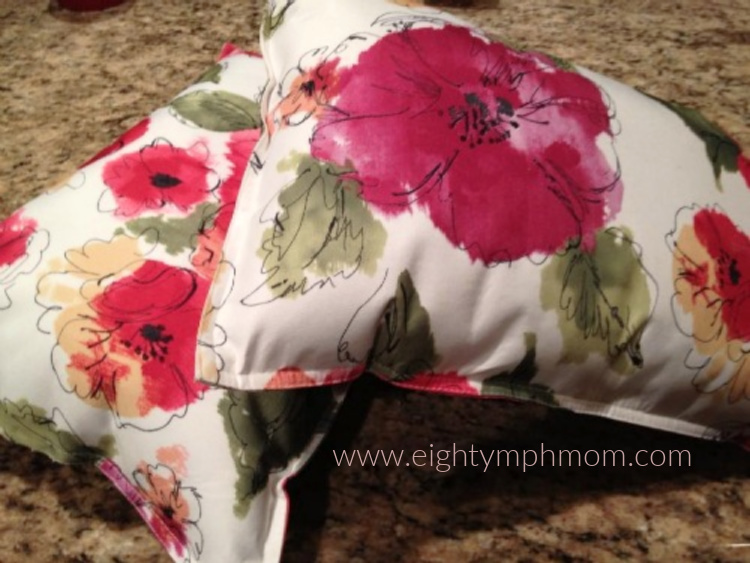
Since our bedroom will be blue and green (I bought a gorgeous duvet cover from Eddie Bauer), these will match perfectly. One side is patterned and one side is plain. The other placemat I bought is patterned on one side and is light blue on the back!
How do you make throw pillows without a sewing machine?
For this DIY homemade no-sew throw pillow project, You will basically be filling a placemat with fiberfill. That’s it! Well there are a few other simple steps, but then you’re done. These take about 15 minutes to make.
To begin, I unstitched the two layers of the placemat about 3 inches on one of the long ends. I stuffed fiberfill inside like this:

Since I am not big on sewing, I purchased fabric glue at the craft store too. When my placemat was sufficiently stuffed, I placed a narrow bead of blue along one side of the placemat (I did it on the green hem), and carefully squeezed the two sides of the placemat together until it held. I attached small paper clips on the area I glued, just to be sure that it had a good seal.


So there you have it – that is how to make your own no-sew throw pillows! Want to see the process in action? Check out my DIY no-sew throw pillow tutorial video!


39 Responses
Seriously so happy you gave them a try. We still use ours. And I mentioned to the mister you made your own after I told you how easy it was and he looked puzzled. Apparently he had no idea that our throw pillows that magically matched our old couch were placemat pillows that I MADE. Such a man… 😀
LOL total man!!! Thank you again for this idea – it worked out perfectly!
seriously, how easy is that! pretty too 🙂
Thanks! I was shocked too at how easy it was. I am not very talented, lol, so I was quite proud!
Wow, how nice! Thanks for the idea and how to!
What a great idea! I just pinned it – now I can’t wait to go shopping for placemats. Thanks for sharing.
Thank you for pinning it! I was so excited to shop for placemats too 🙂 Now I can’t seem to stop – I think I will freshen up every room with new pillows!
That is just the cutest idea and so simple!
I can never believe how expensive pillows are either! The only place I buy them from is IKEA because they’re cheaper there. I love this idea–so cute!
I do love IKEA – I wish there was one a little closer to me so I could browse in-store. These were so easy!
Love this!!! I need some cheap and easy pillows in my life. Great job!
Thanks Kathleen!
Pinned it! Brilliant work…I’m going to pick up some placemats this weekend and do this too.
Yay thank you! It’s such a great (and inexpensive) way to spruce up every room in the house! I’d love to see pics of yours when you’re done!
Great way to tie a design together on a budget, especially if the dining area & living area are adjacent 😀
Exactly! My next project is one of the guest rooms – I found some placemats with fun colors – I’m going to use them to base the whole room design!
that is a gorgeous pillow! decorative pillows are soo expensive!
Can I tell you how much I love this idea? I often wish I were crafty but am totally not. I’ve been wanting new throw pillows for our couches but can’t swallow $15 a pillow. Such a good, good idea. Pinned this, going to make it next week.
Love this idea. I love to have a lot of pillows on our bed (…even though it drives my husband nuts). I love the design on your placemat/pillows!
What a great budget friendly idea!! Just pinned this for when we finally get a new couch! 🙂
I never realized how easy this could be – thank you!
You’re welcome! I had no idea either, and since I don’t sew, this really WAS easy!
what an incredibly frugal, adorable way to make nice decorative throw pillows! i’ve never heard of that but wow do they ever come out nicely. not sure mine would look like that if i tried but hey, for $6 i’d give it a try! 🙂
annae07 at aol dot com
So neat! Thanks for sharing this creative idea, I certainly should try it with my daughter!
What a great idea!
I agree!
LOVE these! What an awesome idea!
This is so clever! Thanks for sharing! I’m going to pin this!
Thank you so much!
This is just the most clever idea! I love it! This is also such a great way to add a change and some personality into our home. I’m thinking that this is actually something that I can pull off even though I’m not great at sewing. Thank you for this faboo idea 🙂
This is such a good idea. I see so many pretty placemats and napkins about!
I am just so in love with this idea! The doors that have been opened, the window sashes thrown open…. Thanks so much for providing both inspiration and information – quite a duo!
Sarah’s Fare recently posted → 15 of the Best Brownie Recipes
These are so fun!! Love this idea. Thanks so much for sharing at our Best Of The Weekend party! Pinning this to our party board. Have a great weekend! xo
What a neat idea, and such a great idea for saving money. Decorative pillows are crazy expensive. It’s awful how people nickle and dime you for things.
I love this idea, I made these myself and really liked how they turned out and it was so easy! I am featuring your post tomorrow on Tuesdays with a Twist Link party, please stop over and take a look. Thanks again and have a great day.
Your pillows turned out great! I just bought a couch for my living room and refuse to spend $25 on a throw pillow! I will have to try out your placemat technique! Great idea.
I agree! I started making these as the ones in the stores are just too expensive! Have fun!
These turned out really cute. What a clever idea!